

|
|
DETAILS
- Manufactured in high quality refractory cement
and fire brick
- Heavily insulated
- All materials are made locally
- Exclusively wood burning
- Finished in terracotta clay and can be painted when dry
INSTALLATION
- Supplied in kit form or fully installed subject to a
quote.
- One day installation period and operational on
same day.
- Can be installed inside or outside.
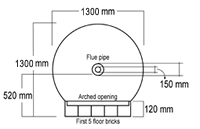
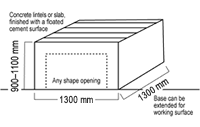
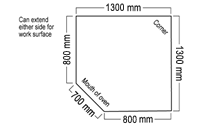
- To be installed on a base with a minimum size
of 1300 mm x 1300 mm x 1000 mm high.
- The top surface of this base should be a concrete slab with reinforcing or lintels with a floated cement finish.
- An expansion joint around the lintels is recommended.
Refer to diagrams alongside for measurements.
DIY INSTRUCTIONS
PARTS
- Floor bricks set into three cement slabs.
- Inner oven, two halves: front half with hot air
tunnel. Both made from refractory concrete.
- Mouth arch in brick for oven opening.
- Insulation.
- Cement for all joins. Mix WITH WATER ONLY in small quantities.
CONSTRUCTION
- Float the 3 floor slabs on a 10 mm to 15 mm
layer of sand. Brick touching brick, no cement
or grout.
- Position the ‘front half’, as per pen marks on
the floor. Bring the ‘back half’ of oven to meet
the front.
- Put the arch in position, ‘touching’ the arch
opening at the front of the oven.
- Cement closed all joins.
- Oven floor to concrete slab (remove excess
sand).
- Oven to fire bricks, outside and inside. Inside
use a wet sponge so that the cement is ‘in’
the join, not exposed.
- Oven front half to back half, cement outside
only.
- Mouth arch to oven (leaving equal space left
and right).
Insulation and clay instructions on collection
- COMPLETE
COST
For a full installation or an oven in kit form a separate quotation will be supplied subject to your requirements.
Please call our office:
021 556 4312 or 083 255 6355 |

